Templates
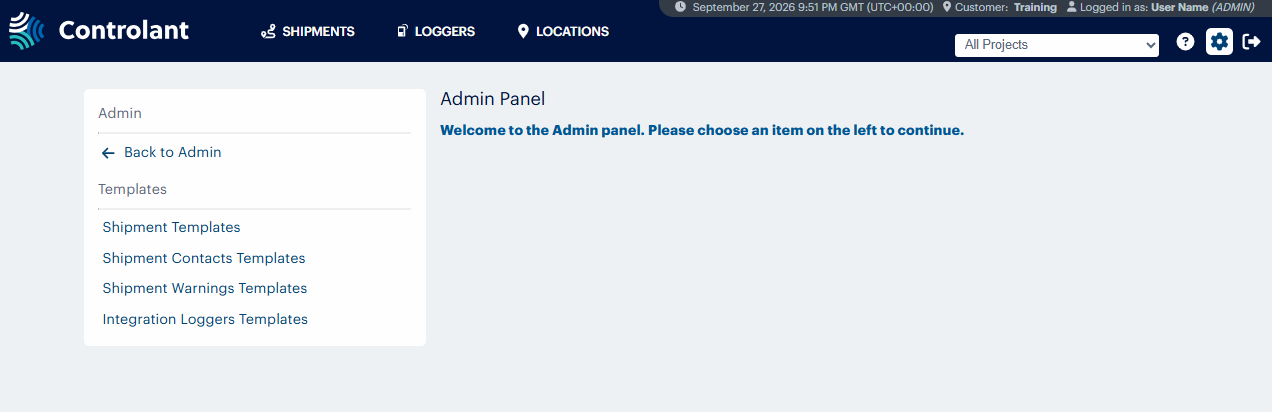
If you have administrator access, you can use the Admin Panel page to manage templates.
Note
This section is only accessible for users with Admin access to the Controlant Platform (SCM).
In the Admin Panel, in the Company Control Panel menu, click Templates.
Shipment Templates
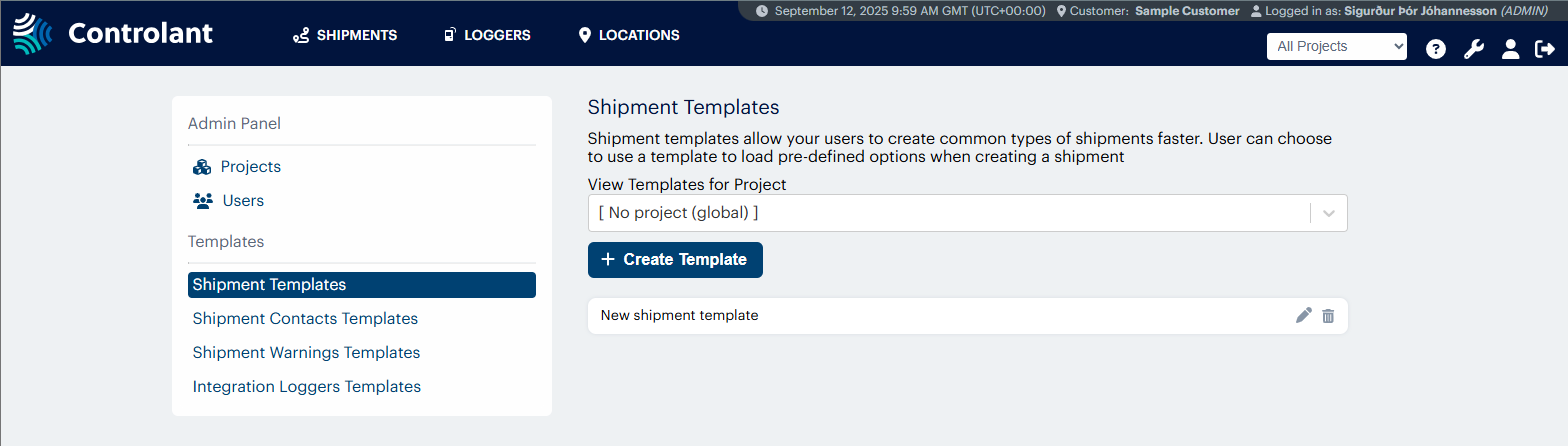
In the Shipment Templates page, Admin users can create new templates and modify or delete existing templates.
Templates can make the shipment creation process faster and easier. You can create templates globally or within projects.
Note
This section is only accessible for users with Admin access to the Controlant Platform (SCM).
To open the Admin Panel, in the header of Controlant Platform (SCM), click  .
.
In the header of Controlant Platform (SCM), click
.The Admin Panel appears,
In the Admin Panel menu, click Shipment Templates.
The Shipment Templates page appears.
You can view existing shipment templates by project, edit or delete shipment templates, or create new templates.
Item | Description |
|---|---|
View templates for project | Project for which to view shipment templates. Select a project and in the Shipment templates list below, shipment templates in that project appear. For more information about projects, see Projects. |
Create template | Opens the Create/ Modify Shipment Template page. |
Item | Description |
|---|---|
Shipment template name | Name of shipment template. |
| Opens the shipment template in Create/ Modify Shipment Template page. |
| Opens a confirmation dialog where you can confirm you want to delete the shipment template. |

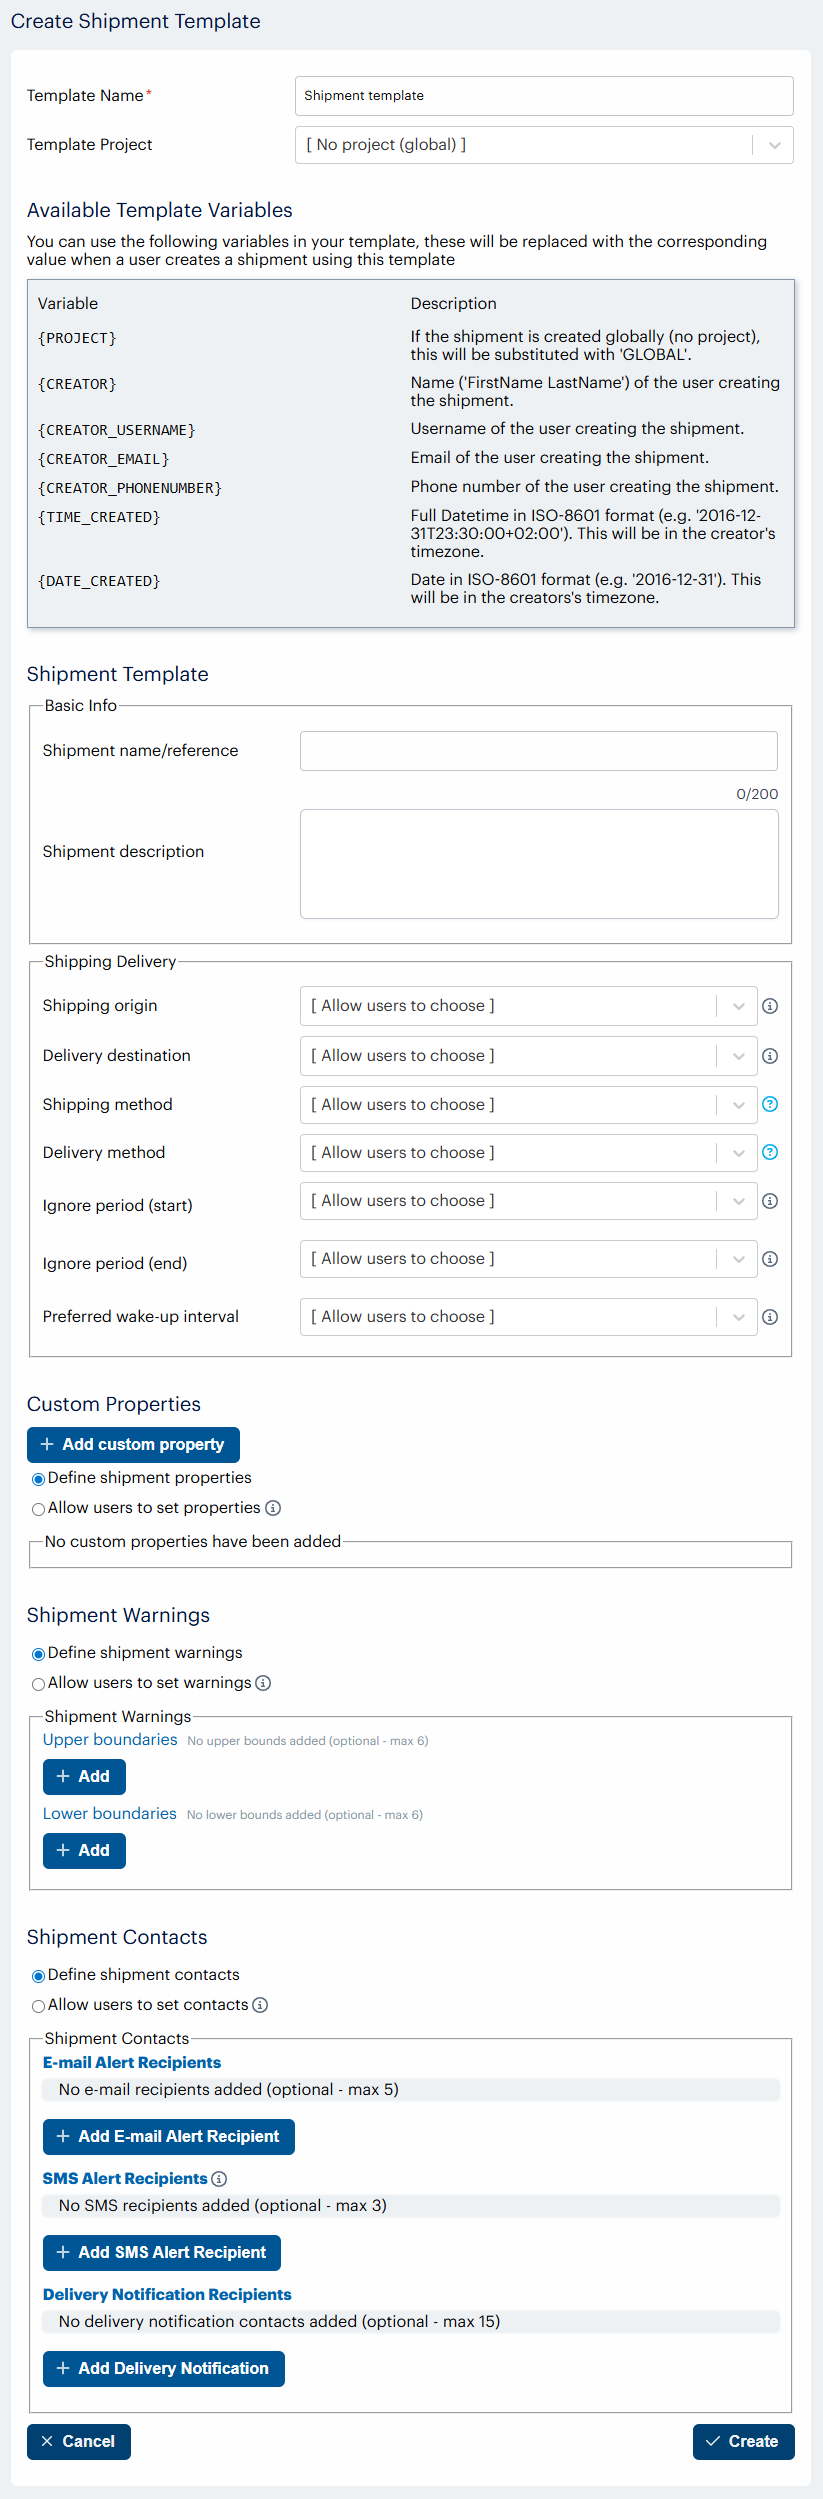
You can create or edit shipment templates.
Item | Description | |
|---|---|---|
Template Name | Name of the template. | |
Template project | Project in which to create the shipment template. For more information about projects, see Projects. | |
Variable | Description |
|---|---|
{PROJECT} | Project the shipment will be created in. If the shipment is created globally (no project), this will be substituted with |
{CREATOR} | Name of user that created the shipment, in |
{CREATOR_USERNAME} | Username of user that created the shipment. |
{CREATOR_EMAIL} | Email address of user that created the shipment. |
{CREATOR_PHONENUMBER} | Phone number of user that created the shipment. |
{TIME_CREATED} | Date shipment is created, in ISO-8601 format, This will be in the creator's timezone. |
{DATE_CREATED} | Date shipment is created, in ISO-8601 format, This will be in the creator's timezone. |
Item | Description |
|---|---|
Shipment name/reference | Name/reference of shipment that will be created from this template. |
Shipment description | Description of shipment that will be created from this template. |
Item | Description |
|---|---|
Shipping origin | Set shipping origin:
TipFor more information about Locations, see Locations. |
Delivery destination | Set shipping origin:
TipFor more information about Locations, see Locations. |
Shipping method | Set shipping method:
For more information about shipping/ start methods, see Shipping/Start methods. |
Delivery method | Set default delivery method:
For more information about shipping/ start methods, see Delivery/Stop methods. |
Ignore period (start) | Period at the end of the shipment where the alarm functionality should be inactive. For more information about ignore periods, see Shipments Ignore Period. |
Ignore period (end) | Period at the end of the shipment where the alarm functionality should be inactive. For more information about ignore periods, see Shipments Ignore Period. |
Preferred wake-up interval | Preferred wake-up interval for Saga devices in the shipment. For more information about wake-up behavior, see Wake-up behavior. |
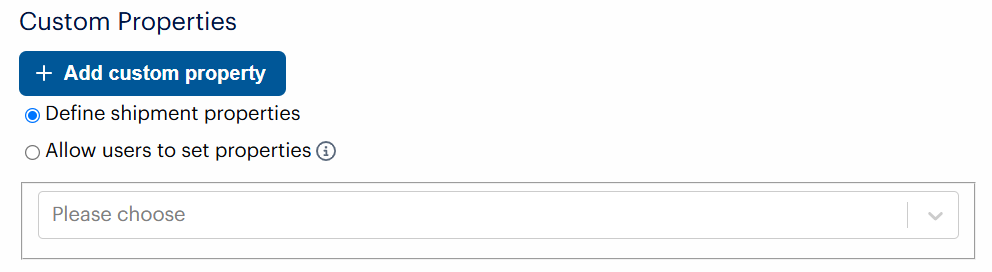
Item | Description |
|---|---|
+ Add custom property | Click to add a custom property that will be defined for shipments created from this template. NoteOnly visible if Define shipment properties is selected. TipFor more information custom properties, see Custom Properties. |
Custom properties | Determines whether you want to define shipment properties for the shipments, or allow users to define shipment properties when creating shipments from this template.
|
Item | Description |
|---|---|
Custom property | Custom property you want to add to shipments created from this template. NoteOnly visible if Define shipment properties is selected and you have clicked + Add custom property. |
Value of custom property | Value of custom property you want to add to shipments created from this template. If you want the user to define the value when creating the shipment from this template, select NoteOnly visible if Define shipment properties is selected and you have clicked + Add custom property. |
 | Saves the custom property. |
 | Discard changes. |
Item | Description |
|---|---|
Custom properties list | List of defined custom properties for this shipment template, and their value. |
 | Opens the custom property for editing. |
 | Deletes the custom property. |
Item | Description |
|---|---|
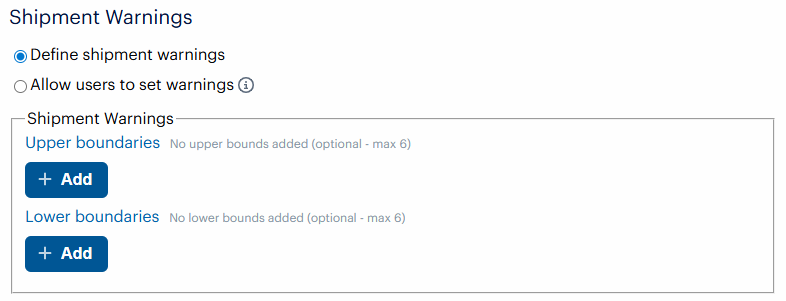
Shipment Warnings | Determines whether you want to define shipment warnings for the shipments, or allow users to define shipment warnings when creating shipments from this template.
|
Note
The following is only visible if Define shipment warnings is selected above.
Item | Description |
|---|---|
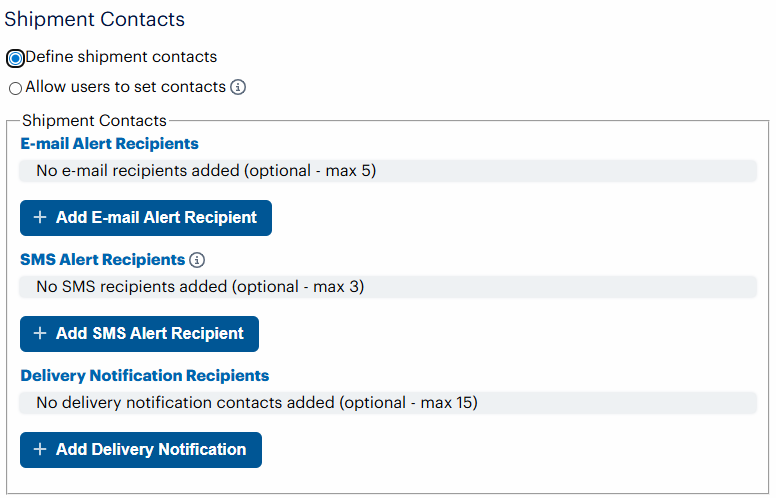
Shipment Contacts | Determines whether you want to define shipment contacts for the shipments, or allow users to define shipment contacts when creating shipments from this template.
|
Note
The following is only visible if Define shipment contacts is selected above.
Contacts you want to receive email notifications about shipments created from this shipment template.
Actions
Item | Description |
|---|---|
Cancel | Discards the changes you have made to the Shipment Template. |
Create | Saves the Shipment Template. |
Shipment templates are helpful when creating whole shipments that include contacts and warnings.
Note
Each item that you configure in the shipment template below will not appear when you create a shipment from the template. Only items you set to Allow users to... will appear.
Click + Create Template.
The Create Shipment Templates page appears.
In the Template Name box, type a name for the template.
To select a project for shipments created from this template, in the Template Project list, do one of the following:
Note
For more information about projects and how to add or manage them, see Projects.
To create a global shipment template (a template that is not in a project), click [ No project (global) ].
To create a shipment template in a project, click the name of the project.
To set the name for shipments created from this template, in the Shipment name/reference box, type the name for the shipment.
To set the description for shipments created from this template, in the Shipment description box, type the description for the shipment.
To set the origin location for shipments created from this template, in the Shipping origin box, do one of the following:
To allow users to choose the location when creating the shipment, select [ Allow users to choose ].
To select a location, click the name of the location.
To set the destination location for shipments created from this template, in the Shipping origin list, do one of the following:
To allow users to choose the location when creating the shipment, select [ Allow users to choose ].
To select a location, click the name of the location.
To set the shipping method for shipments created from this template, in the Shipping method list, do one of the following:
To allow users to choose the shipping method when creating the shipment, select [ Allow users to choose ].
To set the shipping method as Auto, click Auto (Geofence).
To set the shipping method as Button, click Button.
To set the shipping method as Specify time, click Specify time....
A note will appear, saying "The user will be required to specify the time of shipping"
To set the shipping method as Geofence or button, click Geofence or button.
To set the delivery method for shipments created from this template, in the Delivery method list, do one of the following:
To allow users to choose the delivery method when creating the shipment, select [ Allow users to choose ].
To set the delivery method as Auto, click Auto (Geofence).
To set the delivery method as Button, click Button.
A note will appear, saying "The user will be required to specify the time of shipping"
To set the delivery method as Geofence or button, click Geofence OR button.
To set the delivery method as Geofence and button, click Geofence AND button.
To configure the start ignore period for shipments created from this template, in the Delivery method list, do one of the following:
To allow users to choose the start ignore period when creating the shipment, select [ Allow users to choose ].
To set a specified start ignore period, click that ignore period.
To set a custom start ignore period, do the following:
Click Custom.
The custom ignore period configuration area appears.

In the ignore period hours box, type or select the number of hours you want to set.
In the ignore period minutes list, select the number of minutes you want to set.
To configure the preferred wake-up interval for devices in shipments created from this template, in the Preferred wake-up interval list, do one of the following:
To allow users to choose the wake-up interval when creating the shipment, select [ Allow users to choose ].
To set the wake-up interval as 1 hour, click 1 hour.
To set the wake-up interval as 2 hours, click 2 hours.
To set the wake-up interval as 3 hours, click 3 hours.
To set the wake-up interval as 6 hours, click 6 hours.
To set the wake-up interval as 12 hours, click 12 hours.
To set the wake-up interval as 24 hours, click 24 hours.
If you want to configure custom properties, see Configuring custom properties for a shipment template.
If you want to configure shipment warnings, see Configuring shipment warnings for a shipment template.
If you want to configure shipment contacts, see Configuring shipment contacts for a shipment template.
To set custom properties to shipments created from this template, do one of the following:
If you want to set custom properties in shipments created from this template, do the following:
Select Define shipment properties.
Click + Add custom property.
The custom properties list appears, showing a list of custom properties.
In the properties list, click to select the custom property you want to add.
In the properties list, click to select the custom property you want to add.
If you want to allow users to set custom properties when creating the shipment, select Allow users to set properties.
Click
 .
.The custom property is added to the shipment template.
To configure shipment warnings for shipments created from this template, do one of the following:
If you want to configure warnings for shipments created from this template, do the following:
Select Define shipment warnings.
The Shipment Warnings area appears.
To add a warning for upper boundaries, in the Upper boundaries area, for each warning, do the following.
Click + Add.
The Upper boundaries dialog box appears.
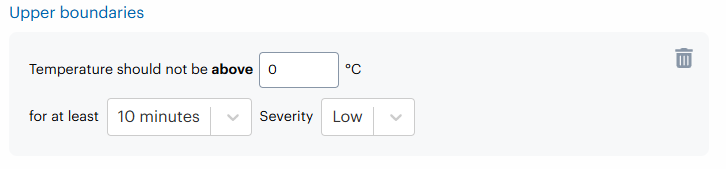
To set the upper boundary of this warning, in the Temperature should not be above box, type the upper boundary of the temperature.
In the for at least list, click to select the maximum amount of time to allow the temperature to exceed the temperature before a warning is sent.
In the Severity list, click to select the type of alarm to trigger.
To set the warning as no severity, click Notification.
To set the warning as low severity, click Low.
To set the warning as medium severity, click Medium.
To set the warning as high severity, click High.
To add a warning for lower boundaries, in the Lower boundaries area, for each warning, do the following.
Click + Add.
The Lower boundaries dialog box appears.
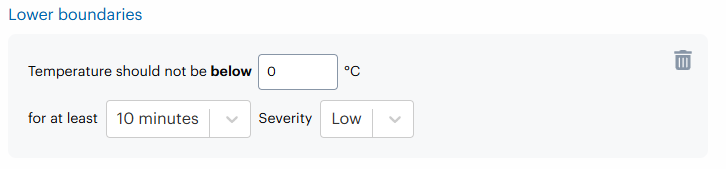
To set the lower boundary of this warning, in the Temperature should not be below box, type the lower boundary of the temperature.
In the for at least list, click to select the maximum amount of time to allow the temperature to exceed the temperature before a warning is sent.
In the Severity list, click to select the type of alarm to trigger.
To set the warning as no severity, click Notification.
To set the warning as low severity, click Low.
To set the warning as medium severity, click Medium.
To set the warning as high severity, click High.
If you want to delete a warning for either upper or lower boundaries, in the area for that boundary, click
.
If you want to allow users to set warnings when creating the shipment, select Allow users to set warnings.
To configure shipment contacts for shipments created from this template, do one of the following:
Caution
If you set the template to define shipment contacts, but do not add any contacts below, shipments created from this template will have no contacts.
Note
If you do not configure shipment contacts in a shipment template, you can assign shipment contacts using contact templates when creating shipments. For more information about Contact templates, see Shipment Contacts Templates.
To set shipment contacts, do the following:
Select Define shipment contacts.
The Shipment Contacts area appears.
If you want to add an email alert recipient, for each contact you want to add, do the following:
Click + Add email alert recipient.
The Email alert recipients area appears.
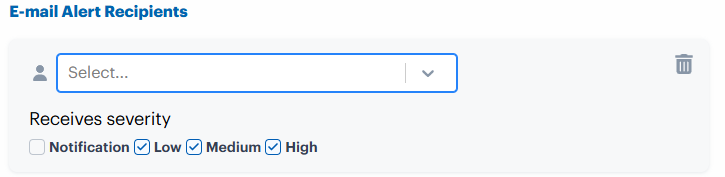
In the contacts list, click to select the contact you want to add.
Note
For more information about adding or modifying users, see Users.
To configure which alerts the user should receive, in the Receives severity area, do one or more of the following:
Note
Click all that apply.
To send a notification for all alerts for , click Notification.
To send a notification for low severity alerts, click Low.
To send a notification for medium severity alerts, click Medium.
To send a notification for high severity alerts, click High.
If you want to add an SMS alert recipient, for each contact you want to add, do the following:
Note
You can only add contacts with mobile phone numbers.
Note
You can add up to 3 SMS alert recipients.
Click + Add SMS alert recipient.
The SMS alert recipients area appears.
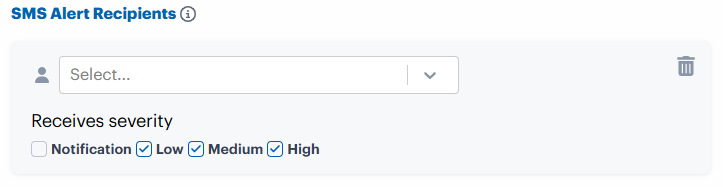
In the contacts list, click to select the contact you want to add.
Note
For more information about adding or modifying users, see Users.
To configure which alerts the user should receive, in the Receives severity area, do one or more of the following:
Note
Click all that apply.
To send a notification for all alerts for , click Notification.
To send a notification for low severity alerts, click Low.
To send a notification for medium severity alerts, click Medium.
To send a notification for high severity alerts, click High.
If you want to add an delivery notification recipient, for each contact you want to add, do the following:
Note
These contacts will receive a notification when the shipment has been delivered.
Click + Add Delivery Notification.
The delivery notification recipients area appears.

In the contacts list, click to select the contact you want to add.
Note
For more information about adding or modifying users, see Users.
To configure whether this user should receive a copy of the Quality Report, do one of the following:
If you want he user to receive a copy of the Quality Report, click to select the Include Report check box.
If you do not want he user to receive a copy of the Quality Report, click to clear the Include Report check box.
Shipment Contacts Templates
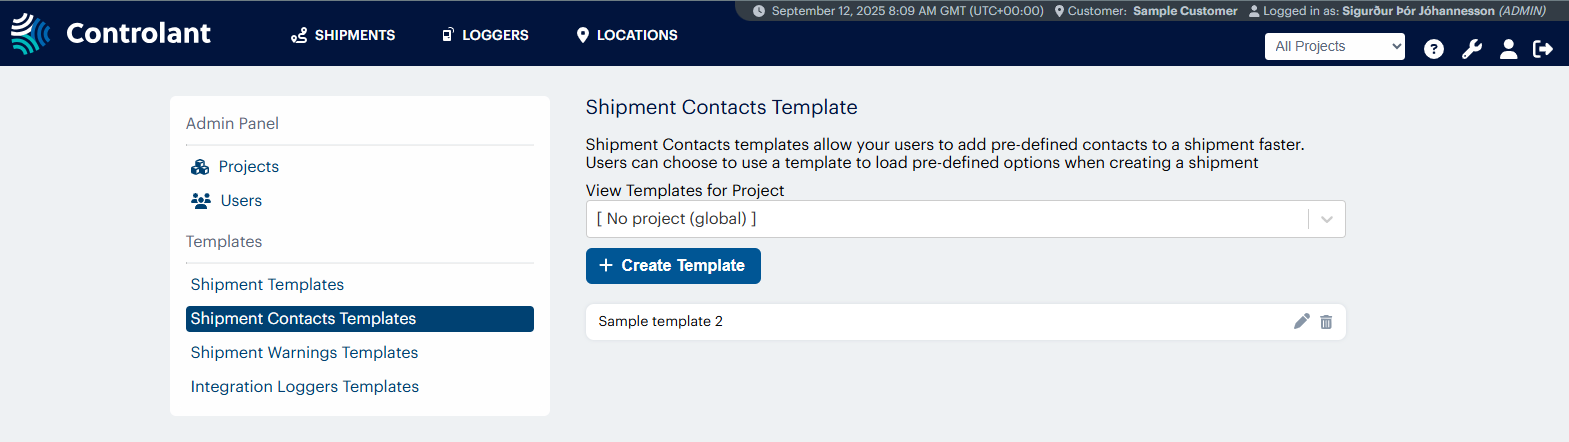
Users with administrator permissions can use the Shipment Contacts Template page to create new shipment contact templates and modify or delete existing templates.
You can use a shipment contact template to group contacts together and add the in one action when creating shipments.
Note
This section is only accessible for users with Admin access to the Controlant Platform (SCM).
In the header of Controlant Platform (SCM), click
.The Admin Panel appears,
In the Admin Panel menu, click Shipment Contacts Templates.
The Shipment Contacts Templates page appears.
Admin Panel menu description
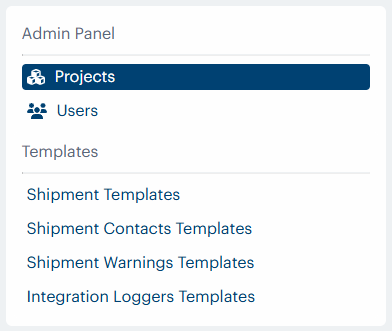
Shipment Contacts Templates page
You can use the Shipment Contacts Templates page to view and modify contact templates.
Item | Description |
|---|---|
View Templates for Project | Project for which to view shipment contact templates. Select a project and in the Shipment contacts templates list below, contact templates in that project appear. For more information about projects, see Projects. |
Create template | Opens the Create Shipment Contacts Template page. |
Item | Description |
|---|---|
Shipment contacts template name | Name of shipment contacts template. |
| Opens the contacts template in Create/ Modify Shipment Contacts Template page. |
| Opens a confirmation dialog where you can confirm you want to delete the shipment contacts template. |
Create/ Modify Shipment Contacts Template page
You can use the Create Shipment Contacts Template page to create and modify contact templates.
Item | Description | |
|---|---|---|
Template Name | Name of the template. | |
Template project | Project to create the contacts template in. For more information about projects, see Projects. | |
Actions
Item | Description |
|---|---|
Cancel | Discards the changes you have made to the Shipment Warnings Template. |
Create | Saves the Shipment Warnings Template. |
In the Shipment Contacts Templates page, click + Create Template.
The Create Shipment Contacts Template page appears.
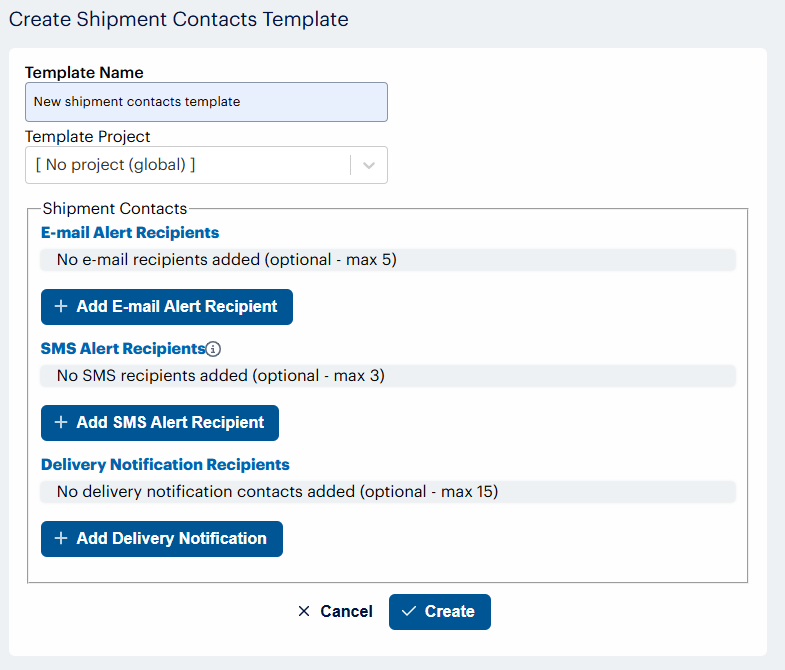
To select a project for shipment contacts, in the Template Project list, do one of the following:
Note
For more information about projects and how to add or manage them, see Projects.
To create a global shipment contact template (a template that is not in a project), click [ No project (global) ].
To create a shipment contact template in a project, click the name of the project.
If you want to add an email alert recipient, for each contact you want to add, do the following:
Click + Add email alert recipient.
The Email alert recipients area appears.
In the contacts list, click to select the contact you want to add.
Note
For more information about adding or modifying users, see Users.
To configure which alerts the user should receive, in the Receives severity area, do one or more of the following:
Note
Click all that apply.
To send a notification for all alerts for , click Notification.
To send alerts for low severity alerts, click Low.
To send alerts for medium severity alerts, click Medium.
To send alerts for high severity alerts, click High.
If you want to add an SMS alert recipient, for each contact you want to add, do the following:
Note
You can only add contacts with mobile phone numbers.
Note
You can add up to 3 SMS alert recipients.
Click + Add SMS alert recipient.
The SMS alert recipients area appears.
In the contacts list, click to select the contact you want to add.
Note
For more information about adding or modifying users, see Users.
To configure which alerts the user should receive, in the Receives severity area, do one or more of the following:
Note
Click all that apply.
To send a notification for all alerts for , click Notification.
To send alerts for low severity alerts, click Low.
To send alerts for medium severity alerts, click Medium.
To send alerts for high severity alerts, click High.
If you want to add an delivery notification recipient, for each contact you want to add, do the following:
Note
These contacts will receive a notification when the shipment has been delivered.
Note
You can add up to 15 delivery notification recipients.
Click + Add Delivery Notification.
The delivery notification recipients area appears.
In the contacts list, click to select the contact you want to add.
Note
For more information about adding or modifying users, see Users.
To configure whether this user should receive a copy of the Quality Report, do one of the following:
If you want he user to receive a copy of the Quality Report, click to select the Include Report check box.
If you do not want he user to receive a copy of the Quality Report, click to clear the Include Report check box.
Click Create.
The Create Shipment Contacts Template page appears, showing the shipment contact template you just created.
Shipment Warnings Templates
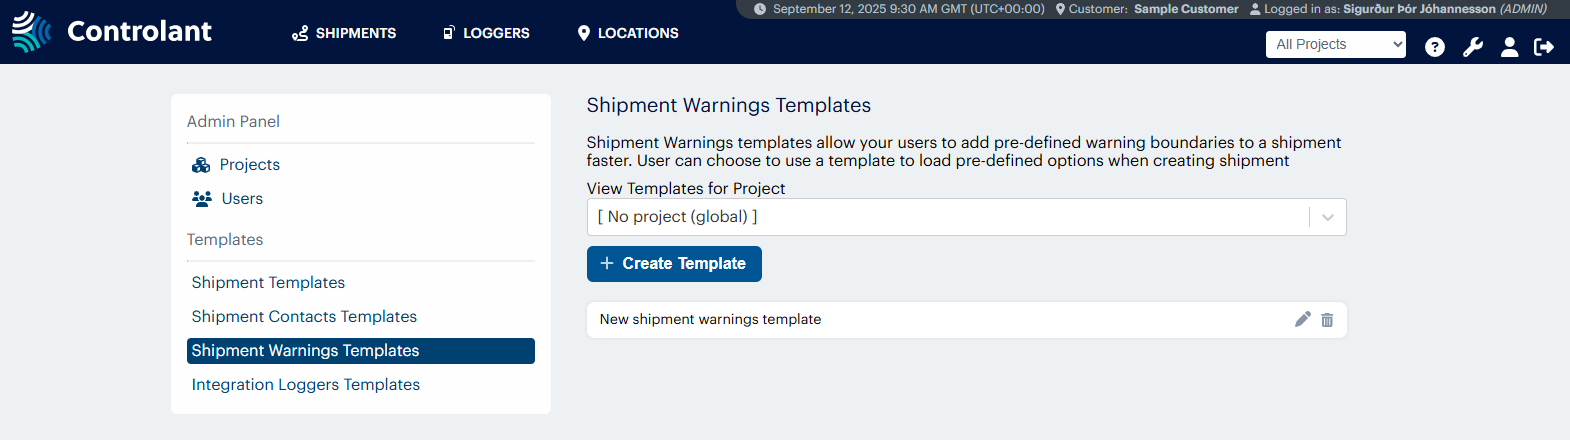
Users with administrator permissions can use the Shipment Warnings Template page to create new shipment warning templates and modify or delete existing templates.
You can use a shipment warning template to create a set of warnings and add the in one action when creating shipments.
Note
This section is only accessible for users with Admin access to the Controlant Platform (SCM).
In the header of Controlant Platform (SCM), click
.The Admin Panel appears,
In the Admin Panel menu, click Shipment Warnings Templates.
The Shipment Warnings Templates page appears.
Admin Panel menu description
Shipment Warnings Templates page
You can use the Shipment Warnings Templates page to view and modify contact templates.
Item | Description |
|---|---|
View Templates for Project | Project for which to view shipment warnings templates. Select a project and in the Shipment contacts templates list below, contact templates in that project appear. For more information about projects, see Projects. |
Create template | Opens the Create Shipment Warnings Template page. |
Item | Description |
|---|---|
Shipment warnings template name | Name of shipment warnings template. |
| Opens the contacts template in Create/ Modify Shipment Contacts Template page. |
| Opens a confirmation dialog where you can confirm you want to delete the shipment contacts template. |
Create/ Modify Shipment Warnings Template page
You can use the Create Shipment Warnings Template page to create and modify warnings templates.
Item | Description | |
|---|---|---|
Template Name | Name of the template. | |
Template project | Project to create the warnings template in. For more information about projects, see Projects. | |
Actions
Item | Description |
|---|---|
Cancel | Discards the changes you have made to the Shipment Warnings Template. |
Create | Saves the Shipment Warnings Template. |
In the Shipment Warnings Templates page, click + Create Template.
The Create Shipment Warnings Template page appears.
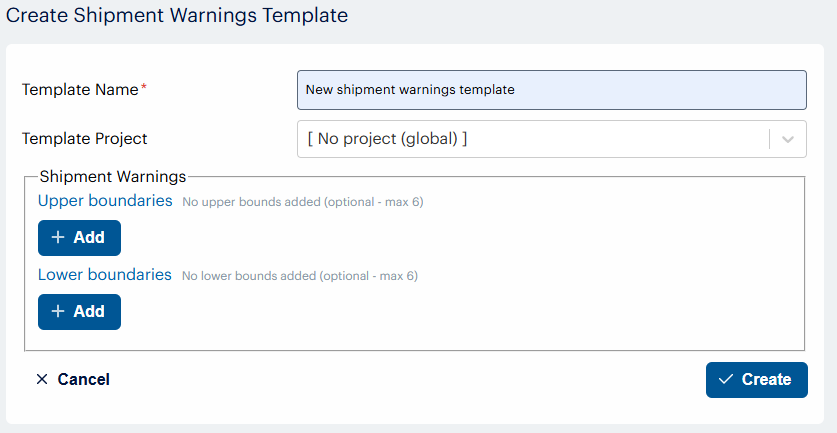
To select a project for shipment warning, in the Template Project list, do one of the following:
Note
For more information about projects and how to add or manage them, see Projects.
To create a global shipment warning template (a template that is not in a project), click [ No project (global) ].
To create a shipment warning template in a project, click the name of the project.
To add a warning for upper boundaries, in the Upper boundaries area, for each warning, do the following.
Click + Add.
The Upper boundaries dialog box appears.
To set the upper boundary of this warning, in the Temperature should not be above box, type the upper boundary of the temperature.
In the for at least list, click to select the maximum amount of time to allow the temperature to exceed the temperature before a warning is sent.
In the Severity list, click to select the type of alarm to trigger.
To set the warning as no severity, click Notification.
To set the warning as low severity, click Low.
To set the warning as medium severity, click Medium.
To set the warning as high severity, click High.
To add a warning for lower boundaries, in the Lower boundaries area, for each warning, do the following.
Click + Add.
The Lower boundaries dialog box appears.
To set the lower boundary of this warning, in the Temperature should not be below box, type the lower boundary of the temperature.
In the for at least list, click to select the maximum amount of time to allow the temperature to exceed the temperature before a warning is sent.
In the Severity list, click to select the type of alarm to trigger.
To set the warning as no severity, click Notification.
To set the warning as low severity, click Low.
To set the warning as medium severity, click Medium.
To set the warning as high severity, click High.
Click Create.
The Create Shipment Warnings Template page appears, showing the shipment warning template you just created.
Integration Loggers Templates
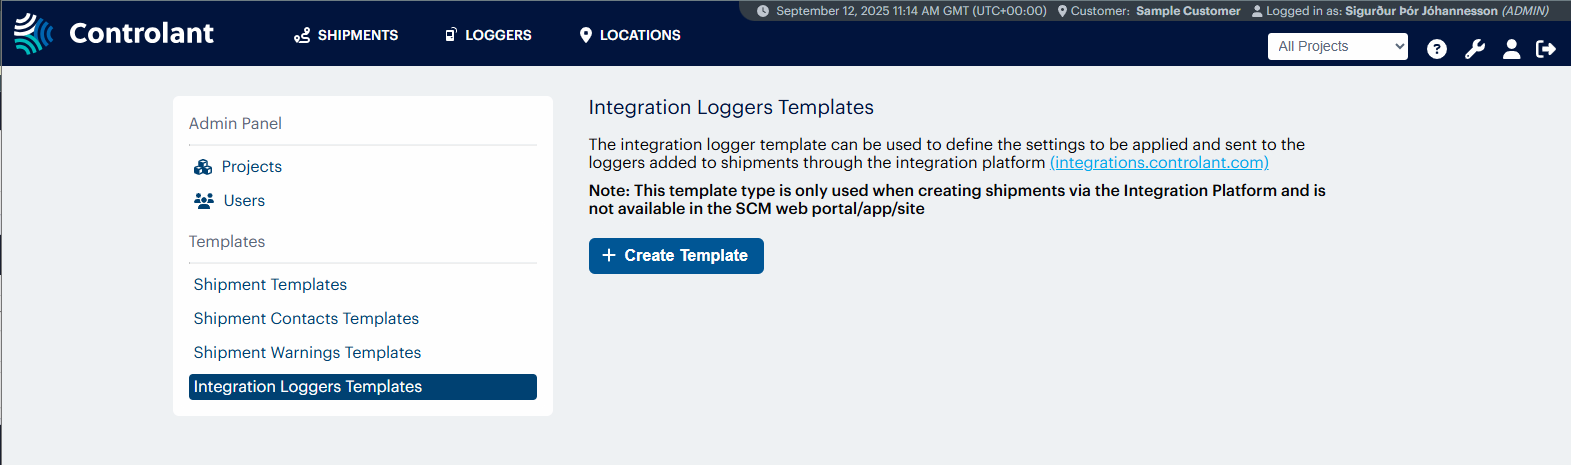
Users with administrator permissions can use the Integration Loggers Templates page to to define the settings to be applied and sent to the devices added to shipments through the Controlant Integrations API.
Note
This template type is only used when creating shipments via the Controlant Integrations API and is not available when you create shipments in the Controlant Platform (SCM) UI.
Note
This section is only accessible for users with Admin access to the Controlant Platform (SCM).
In the header of Controlant Platform (SCM), click
.The Admin Panel appears.
In the Admin Panel menu, click Integration Loggers Templates.
The Integration Loggers Templates page appears.
You can use the Integration Loggers Templates page to view and modify logger templates to use when creating shipments via the Controlant Integrations API.
Item | Description |
|---|---|
Create template | Opens the Create Integration Loggers Template page. |
Integration Loggers Template list | |
Integration loggers template name | Name of integration loggers template. |
| Opens the Integration loggers template in Create/ Modify Integration Loggers Template page. |
| Opens a confirmation dialog where you can confirm you want to delete the integration loggers template. |
Item | Description |
|---|---|
Template Name | Name of integration loggers template. |
Shipping & Delivery | |
Shipping method | Set shipping method:
For more information about shipping/ start methods, see Delivery/Stop methods. |
Delivery method | Set default delivery method:
For more information about shipping/ start methods, see Delivery/Stop methods. |
Ignore period (start) | Period at the end of the shipment where the alarm functionality should be inactive. For more information about ignore periods, see Shipments Ignore Period. |
Ignore period (end) | Period at the end of the shipment where the alarm functionality should be inactive. For more information about ignore periods, see Shipments Ignore Period. |
Preferred wake-up interval | Preferred wake-up interval for Saga devices in the shipment. For more information about wake-up behavior, see Wake-up behavior. |
Severity | |
Excursion Severity | Severity of alarm to send. If shipment temperature goes below the configured boundary for longer than configured, an alarm is triggered with this severity:
|
In the Integration Loggers Templates page, click + Create Template.
The Create Integration Loggers Template page appears.
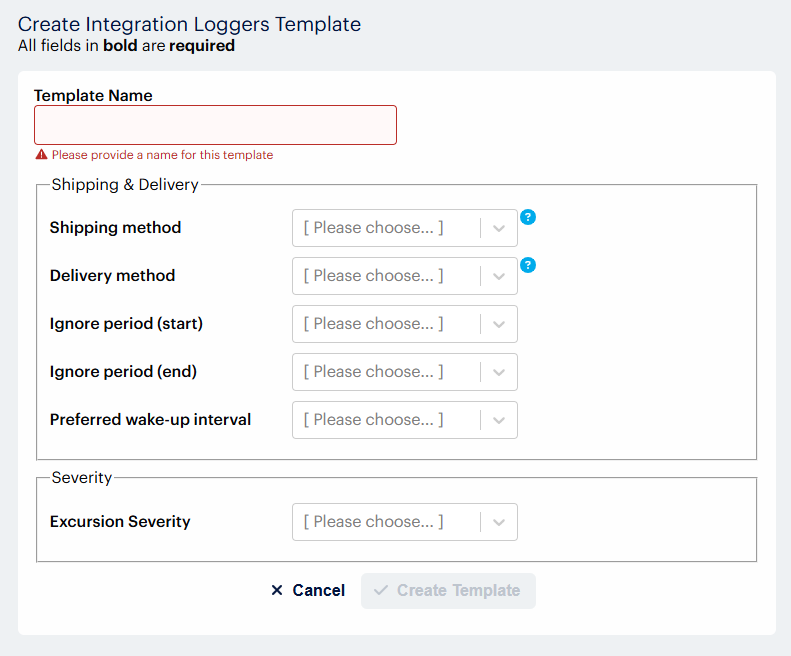
In the Template Name box, type a name for the template.
To set the shipping method for device s configured using this template, in the Shipping method list, do one of the following:
To set the shipping method as Auto, click Auto (Geofence).
To set the shipping method as Button, click Button.
To set the shipping method as Specify time, click Specify time....
A note will appear, saying "The user will be required to specify the time of shipping"
To set the shipping method as Geofence or button, click Geofence or button.
To set the delivery method for device s configured using this template, in the Delivery method list, do one of the following:
To set the delivery method as Auto, click Auto (Geofence).
To set the delivery method as Button, click Button.
A note will appear, saying "The user will be required to specify the time of shipping"
To set the delivery method as Specify time, click Specify time....
To set the delivery method as Geofence or button, click Geofence OR button.
To set the delivery method as Geofence and button, click Geofence AND button.
To configure the start ignore period for device s configured using this template, in the Delivery method list, do one of the following:
To set a specified start ignore period, click that ignore period.
To set a custom start ignore period, do the following:
Click Custom.
The custom ignore period configuration area appears.
In the ignore period hours box, type or select the number of hours you want to set.
In the ignore period minutes list, select the number of minutes you want to set.
To configure the preferred wake-up interval for device s configured using this template, in the Preferred wake-up interval list, do one of the following:
To set the wake-up interval as 1 hour, click 1 hour.
To set the wake-up interval as 2 hours, click 2 hours.
To set the wake-up interval as 3 hours, click 3 hours.
To set the wake-up interval as 6 hours, click 6 hours.
To set the wake-up interval as 12 hours, click 12 hours.
To set the wake-up interval as 24 hours, click 24 hours.
To configure the excursion severity for device s configured using this template, in the Severity list, click to select the type of alarm to trigger.
To set the excursion severity as notification, click Notification.
To set the excursion severity as low, click Low.
To set the excursion severity as medium, click Medium.
To set the excursion severity as high, click High.
Click Create Template.
The Integration Loggers Templates page appears, showing the integration loggers template template you just created.